Roles and Privileges
In the realm of data security and access control, Qodly introduces a robust system of Roles and Privileges. These two fundamental concepts are at the heart of enforcing data access restrictions within the application. By understanding the Roles and Privileges, you can ensure that each user accesses only the data pertinent to their designated role.
Roles: Defining User Profiles
Understanding Roles
Roles play a pivotal role in defining distinct user profiles within Qodly. Each role corresponds to a specific set of responsibilities, privileges, and access levels.
In a backoffice travel agency solution, roles like Agent, Content Manager, and Sales Manager define distinct user profiles, each with specific actions and operations.
Role Hierarchy
Roles are hierarchically structured, allowing for the establishment of an organized and layered access control system. This hierarchy ensures that higher-level roles encompass the privileges of lower-level roles, creating a seamless and efficient method of managing user access. This hierarchical access control enhances the granularity of access management, facilitating a streamlined and systematic approach.
Adding Roles
To add a role, follow these steps:
- Open the
ExplorerPanel. - Navigate to the
Roles and Privilegessection. - Click on the
Rolestab to access role management. - To create a new role, click on the
Add new rolecard.
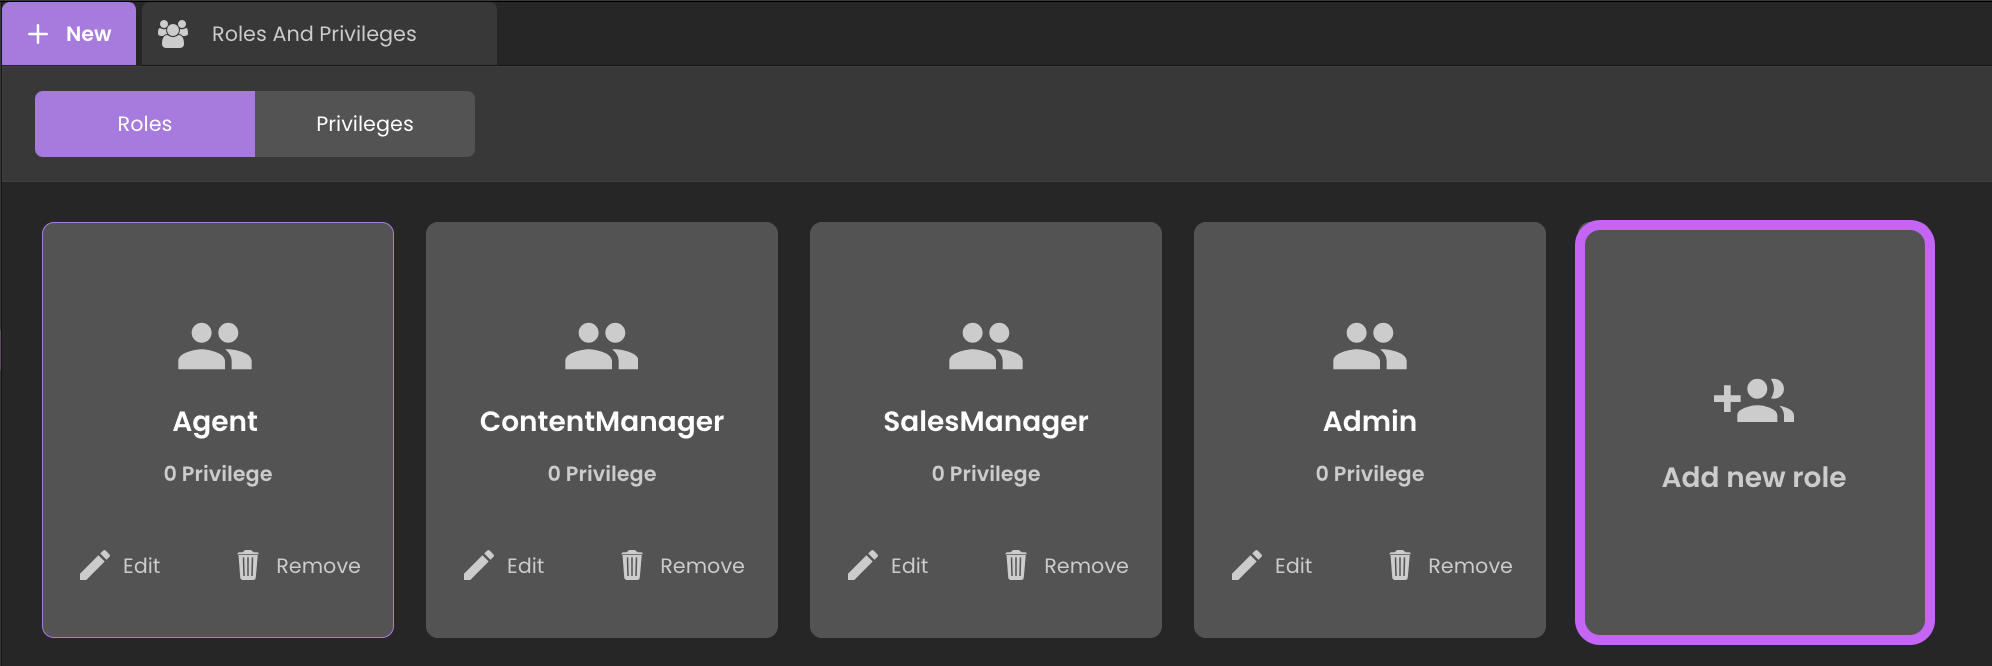
In a backoffice travel agency solution, you can customize unique roles such as Agent, Content Manager, and Sales Manager to perfectly align with your specific application needs:
| Roles | Description |
|---|---|
| Agent | Reserves and customizes travel packages for clients. |
| Content Manager | Manages website content, including creating and updating travel packages. |
| Sales Manager | Manages customer bookings, views sales reports, and generates invoices. |
Privileges: Enabling Controlled Access
Understanding Privileges
Privileges are the building blocks of access control. They define the specific technical capabilities and actions that users of different roles can perform. By assigning privileges to roles, you determine the extent of a user's access to data and functionalities.
Adding Privileges
To add a privilege, follow these steps:
- Open the
ExplorerPanel. - Navigate to the
Roles and Privilegessection. - Click on the
Privilegestab to access privileges management. - Click on the
+button to create a new privilege.

In a backoffice travel agency solution, you can customize distinct privileges like ManageReports, ManageBookings, and ManageContent to align with the capabilities and actions assigned to each role."
| Privileges | Description |
|---|---|
| ManageReports | Access to sales reports and statistical data. |
| ManageBookings | Manage customer bookings, verify reservations, and generate invoices. |
| ManageContent | Access and manage the travel agency's online content. |
Interplay Between Roles and Privileges
Achieving the optimal synchronization of roles and privileges ensures seamless task execution for users while maintaining robust data security.
To assign one or multiple privileges to a role, follow these steps:
- Navigate to the
Rolestab within theRoles and Privilegessection. - Select the desired role (e.g.,
Sales Manager). - Locate the privileges side section on the far right.
- In this section, you'll find a comprehensive list of available privileges.
- To assign a privilege, click the
+icon. - To remove a privilege, simply click the
-icon.
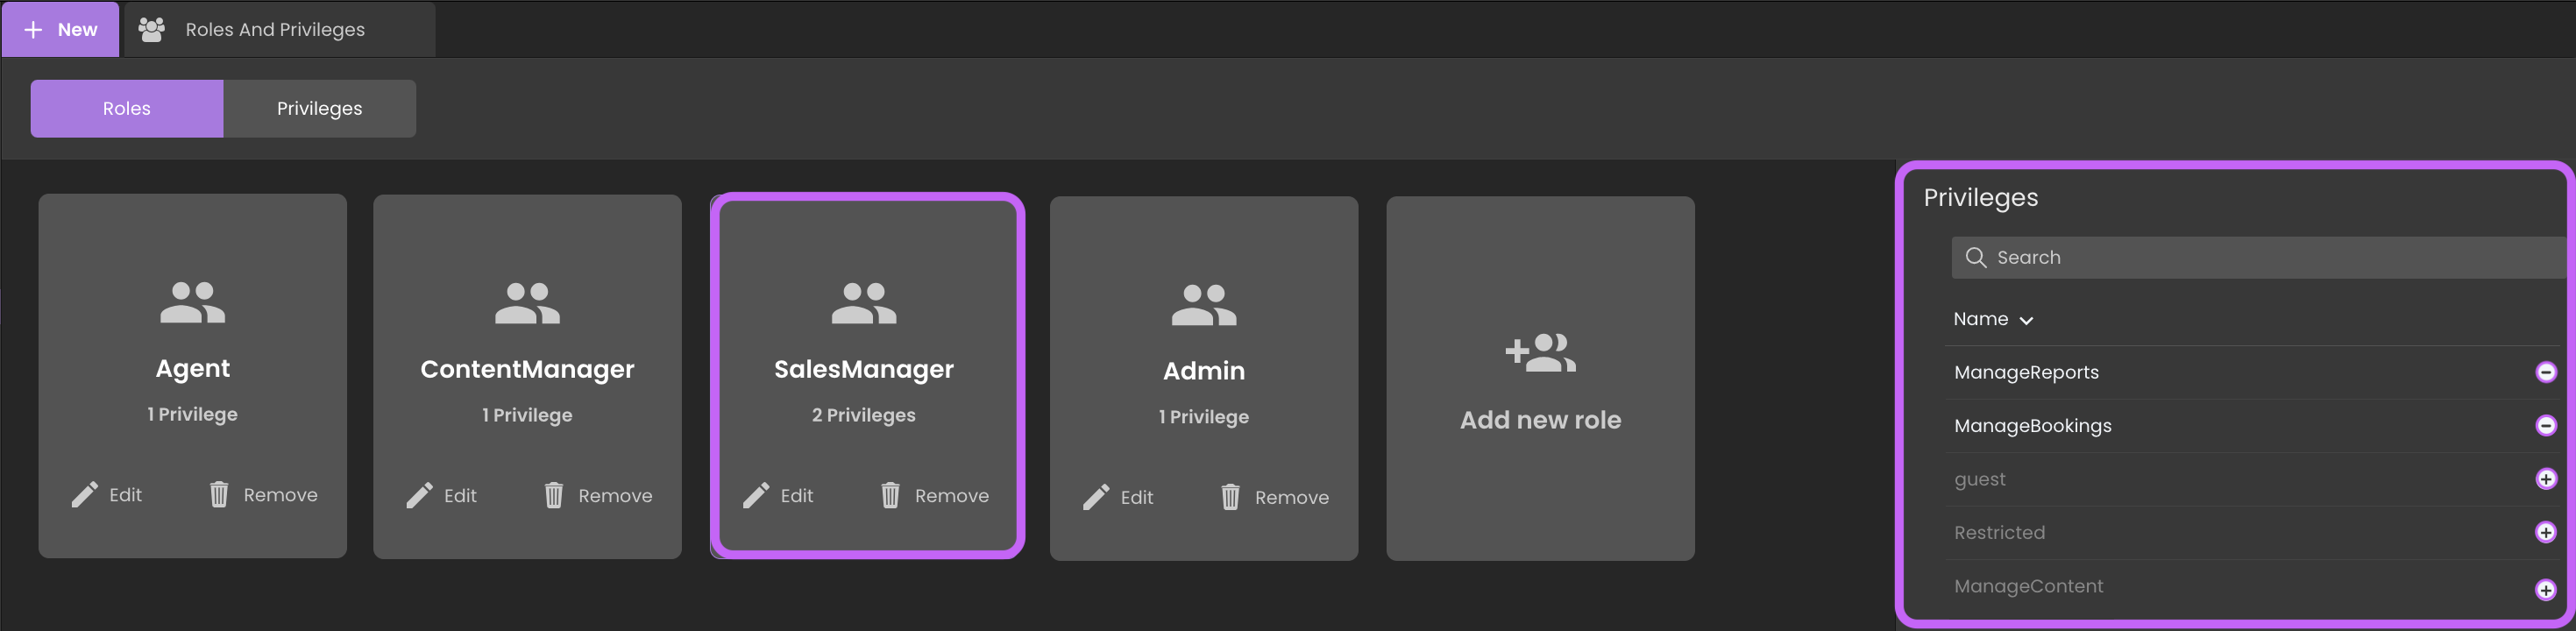
For instance, a Sales Manager role might possess privileges like ManageBookings and ViewReports, granting them the ability to analyze booking trends and monitor revenue for informed decision-making. Similarly, a Content Manager role could receive the privilege ManageContent.
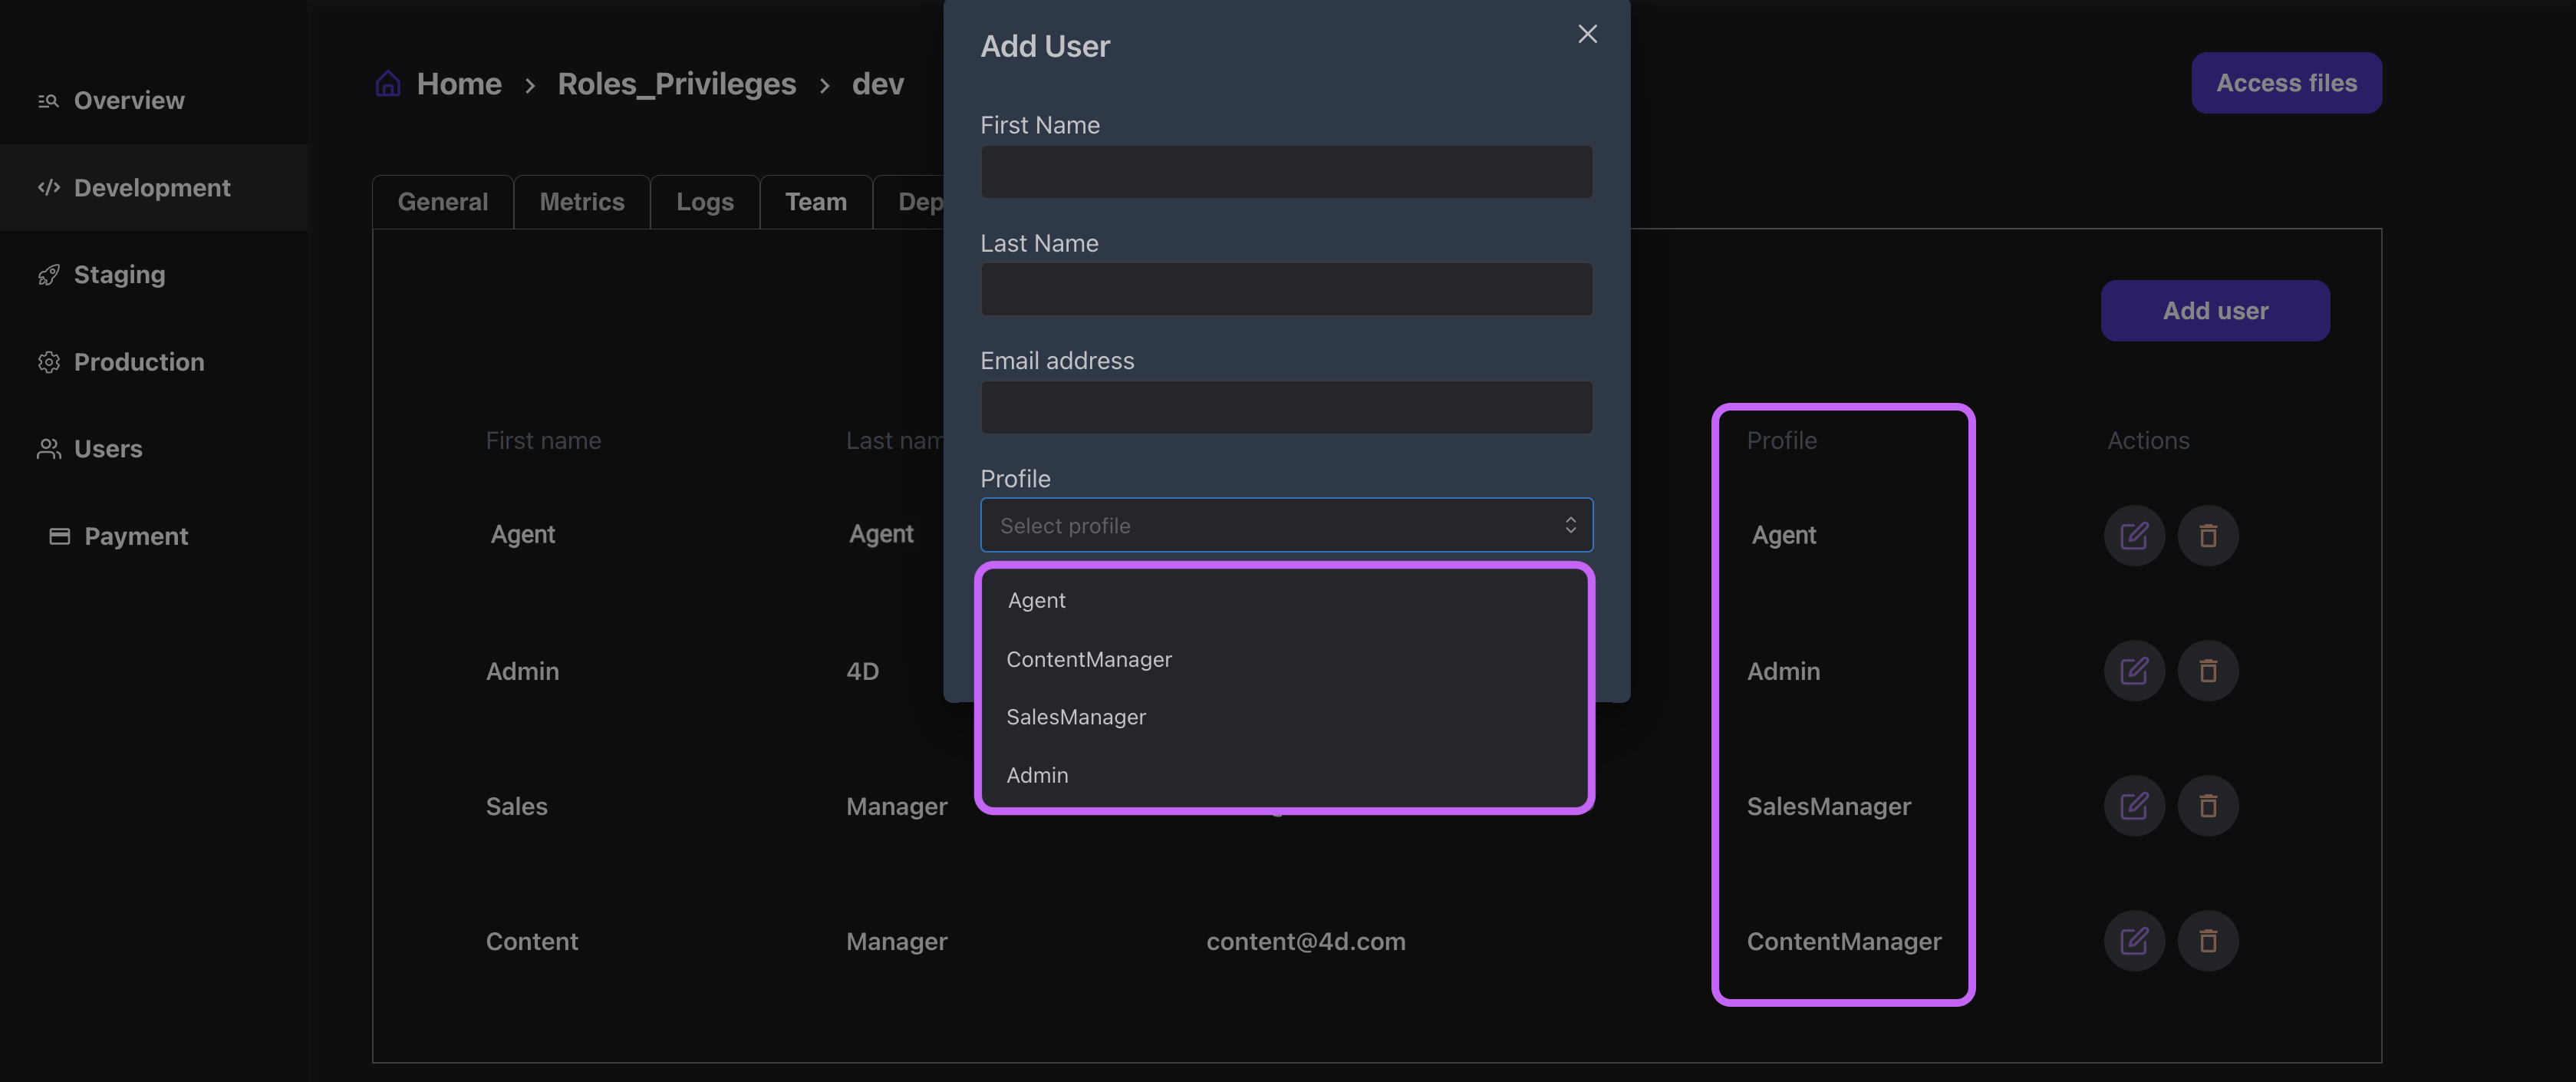
Assigning Roles
Through the Qodly Management Console of your application, you can seamlessly integrate roles for users across various environments, be it development, staging, or production – each with its own tailored configuration.
It's important to note that roles added in the development environment may not necessarily align with those in the production environment for example.
For instance, in the development environment:
- Go to the
Teamstab to see a list of available users, each linked to their respective roles. - Click the
Add Userbutton in the upper-right corner to add a new user. - Complete the form that appears with the necessary user data.
- Find a dropdown menu labeled
Profiletowards the end of the form, displaying roles added from Qodly Studio under theRoles and Privilegessection. - Select and assign the appropriate role to the new user from the list, providing specific privileges associated with that role.
The impact of these role assignments goes beyond mere user administration. As you mold your application, these roles exert a direct influence on the user journey.
View management restrictions are just the initial step, subsequent stages will involve extending these limitations to various other aspects of interaction.
Retrieving Current Session Information
In Qodly, user information in the current session is available via cs.Qodly.Users class. This allows you to retrieve essential user details, such as their email, role, first name, and last name. Use the code below:
exposed Function loadSessionUserInfo()
    var userCS : cs.Qodly.Users

    userCS = cs.Qodly.Users.new()

    use(session.storage)
        session.storage.currentUser = userCS.getCurrentUser()
    end

    ds.User.linkAccount()
By utilizing the loadSessionUserInfo() function, fetch and store user data for session-wide access.
On the other hand, the linkAccount() function links sessions and profiles, allowing extended data storage. This enhances profiles with varied information such as images, preferences, and historical data.
exposed function linkAccount()
    if(session.storage.currentUser!=null)
        user = this.query("email = :1", session.storage.currentUser.email).first()
        if(user == null)
            user = ds.User.new()
            user.email = session.storage.currentUser.email
            user.save()
        end
    end
For more detailed information, refer to the Sessions and Users sections.
Roles and privileges JSON Representation
In Qodly Studio, the Roles and privileges possesses a JSON representation that is useful for troubleshooting or to copy/paste selected parts.
Roles and privileges in the Explorer and choosing Open With a Text Editor.
You can view, copy, or edit the JSON representation.
It is essential to exercise caution when editing the JSON representation, as the syntax check does not validate whether attribute names match the expected ones or if there are issues with the attribute names.